Arduino to Python Lab Conversion

This interactive guide converts Arduino C++ code to Python equivalents for various sensors and actuators. Each lab includes circuit diagrams, original Arduino code, and Python implementations using libraries like RPi.GPIO and gpiozero for Raspberry Pi.

Gas Sensor

Smoke detection with LED and buzzer alerts

Flex Sensor

Servo control based on flex sensor input

Pressure Sensor

Force-sensitive servo positioning

Temperature Sensor

Temperature monitoring with alerts

Servo Actuator

Micro:bit servo control with gestures

๐ŸŒซ๏ธ Gas Sensor Lab

Smoke/Gas Detection System with Visual and Audio Alerts
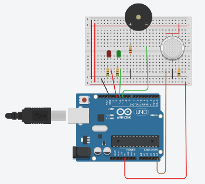
Gas Sensor Circuit Diagram

Gas Sensor Circuit Configuration

Original Arduino Code
int LED1 = 12; int LED2 = 11; int buzzer = 10; int smoke = A5; int sensorThreshold = 500; void setup() { pinMode(LED1, OUTPUT); pinMode(LED2, OUTPUT); pinMode(buzzer, OUTPUT); pinMode(smoke, INPUT); Serial.begin(9600); } void loop() { int analogSensor = analogRead(smoke); Serial.print("SENSOR: "); Serial.println(analogSensor); if (analogSensor > sensorThreshold) { digitalWrite(LED1, HIGH); digitalWrite(LED2, LOW); tone(buzzer, 1000, 350); } else { digitalWrite(LED1, LOW); digitalWrite(LED2, HIGH); noTone(buzzer); } delay(100); }
Python Code (Raspberry Pi)
import RPi.GPIO as GPIO import time import pygame from gpiozero import MCP3008 # Pin Configuration LED1 = 18 LED2 = 19 BUZZER = 20 SENSOR_THRESHOLD = 0.5 # Normalized value (0-1) # Setup GPIO.setmode(GPIO.BCM) GPIO.setup(LED1, GPIO.OUT) GPIO.setup(LED2, GPIO.OUT) GPIO.setup(BUZZER, GPIO.OUT) # Initialize ADC for analog sensor smoke_sensor = MCP3008(channel=0) # Initialize pygame for buzzer sound pygame.mixer.init() def play_tone(frequency, duration): """Generate a tone using pygame""" sample_rate = 22050 frames = int(duration * sample_rate / 1000) arr = [] for i in range(frames): wave = 4096 * (0.5 * (1 + (i // (sample_rate // frequency)) % 2)) arr.append([wave, wave]) sound = pygame.sndarray.make_sound(arr) sound.play() try: while True: # Read analog sensor value (0.0 to 1.0) sensor_value = smoke_sensor.value print(f"SENSOR: {sensor_value:.3f}") if sensor_value > SENSOR_THRESHOLD: # Gas detected - Alert mode GPIO.output(LED1, GPIO.HIGH) GPIO.output(LED2, GPIO.LOW) play_tone(1000, 350) else: # Normal mode GPIO.output(LED1, GPIO.LOW) GPIO.output(LED2, GPIO.HIGH) time.sleep(0.1) except KeyboardInterrupt: print("Program stopped") finally: GPIO.cleanup() pygame.mixer.quit()

Key Differences in Python Implementation:

  • GPIO Library: Uses RPi.GPIO for pin control instead of Arduino's digitalWrite
  • Analog Input: Requires MCP3008 ADC chip since Raspberry Pi lacks built-in ADC
  • Sound Generation: Uses pygame library to generate tones instead of Arduino's tone() function
  • Normalized Values: Sensor readings are normalized (0.0-1.0) rather than raw ADC values
  • Exception Handling: Includes proper cleanup for GPIO pins and resources

๐Ÿ”ง Flex Sensor Lab

Servo Motor Control Based on Flex Sensor Input
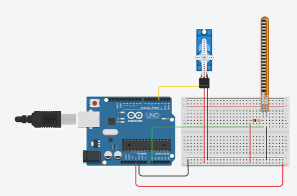
Flex Sensor Circuit Diagram

Flex Sensor with Servo Motor Configuration

Original Arduino Code
#include <Servo.h> Servo myServo; #define flexPin A0 void setup() { myServo.attach(3); Serial.begin(9600); } void loop() { int flexValue; int servoPosition; flexValue = analogRead(flexPin); servoPosition = map(flexValue, 770, 950, 0, 180); servoPosition = constrain(servoPosition, 0, 180); myServo.write(servoPosition); Serial.print("sensor ="); Serial.println(flexValue); Serial.print("servo ="); Serial.println(servoPosition); delay(20); }
Python Code (Raspberry Pi)
import time from gpiozero import Servo, MCP3008 # Pin Configuration SERVO_PIN = 18 FLEX_MIN = 0.2 # Minimum flex sensor reading FLEX_MAX = 0.8 # Maximum flex sensor reading # Setup components servo = Servo(SERVO_PIN) flex_sensor = MCP3008(channel=0) def map_value(value, in_min, in_max, out_min, out_max): """Map a value from one range to another""" return (value - in_min) * (out_max - out_min) / (in_max - in_min) + out_min def constrain(value, min_val, max_val): """Constrain value within specified range""" return max(min_val, min(max_val, value)) try: while True: # Read flex sensor value (0.0 to 1.0) flex_value = flex_sensor.value # Map sensor value to servo position (-1 to 1 for gpiozero) servo_position = map_value(flex_value, FLEX_MIN, FLEX_MAX, -1, 1) servo_position = constrain(servo_position, -1, 1) # Set servo position servo.value = servo_position # Convert to degrees for display (0-180) servo_degrees = map_value(servo_position, -1, 1, 0, 180) print(f"Sensor: {flex_value:.3f}, Servo: {servo_degrees:.1f}ยฐ") time.sleep(0.02) # 20ms delay except KeyboardInterrupt: print("Program stopped") finally: servo.close()

Python Implementation Notes:

  • Servo Control: gpiozero.Servo provides easy servo control with values from -1 to 1
  • Value Mapping: Custom map_value() function replaces Arduino's map() function
  • PWM Alternative: Can use RPi.GPIO PWM for direct hardware control
  • Sensor Calibration: Uses normalized sensor readings with configurable min/max values
  • Smooth Operation: Maintains 20ms timing for smooth servo movement

โšก Pressure Force Sensor Lab

Force-Sensitive Servo Motor Positioning System
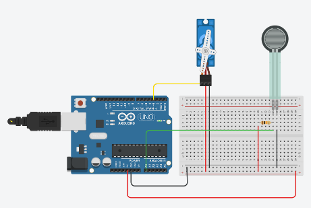
Pressure Sensor Circuit Diagram

Pressure Force Sensor with Servo Motor

Original Arduino Code
#include <Servo.h> Servo myServo; #define forcePin A0 void setup() { myServo.attach(3); Serial.begin(9600); } void loop() { int forceValue; int servoPosition; forceValue = analogRead(forcePin); servoPosition = map(forceValue, 770, 950, 0, 180); servoPosition = constrain(servoPosition, 0, 180); myServo.write(servoPosition); Serial.print("sensor ="); Serial.println(forceValue); Serial.print("servo ="); Serial.println(servoPosition); delay(20); }
Python Code (Raspberry Pi)
import time import statistics from gpiozero import Servo, MCP3008 # Pin Configuration SERVO_PIN = 18 FORCE_MIN = 0.1 # Minimum force reading FORCE_MAX = 0.9 # Maximum force reading # Setup components servo = Servo(SERVO_PIN) force_sensor = MCP3008(channel=0) # Smoothing variables readings_buffer = [] BUFFER_SIZE = 5 def map_value(value, in_min, in_max, out_min, out_max): """Map a value from one range to another""" return (value - in_min) * (out_max - out_min) / (in_max - in_min) + out_min def constrain(value, min_val, max_val): """Constrain value within specified range""" return max(min_val, min(max_val, value)) def smooth_reading(new_reading): """Apply moving average smoothing to sensor readings""" global readings_buffer readings_buffer.append(new_reading) if len(readings_buffer) > BUFFER_SIZE: readings_buffer.pop(0) return statistics.mean(readings_buffer) try: print("Force Sensor to Servo Control") print("Apply pressure to control servo position") print("-" * 40) while True: # Read force sensor value raw_force = force_sensor.value # Apply smoothing smooth_force = smooth_reading(raw_force) # Map force to servo position (-1 to 1) servo_position = map_value(smooth_force, FORCE_MIN, FORCE_MAX, -1, 1) servo_position = constrain(servo_position, -1, 1) # Set servo position servo.value = servo_position # Convert to degrees for display servo_degrees = map_value(servo_position, -1, 1, 0, 180) # Display force level as bar graph force_percentage = constrain(smooth_force / FORCE_MAX * 100, 0, 100) bar_length = int(force_percentage / 5) force_bar = "โ–ˆ" * bar_length + "โ–‘" * (20 - bar_length) print(f"Force: {smooth_force:.3f} [{force_bar}] Servo: {servo_degrees:.1f}ยฐ") time.sleep(0.02) except KeyboardInterrupt: print("\nProgram stopped") finally: servo.close()

Enhanced Python Features:

  • Signal Smoothing: Implements moving average filter to reduce sensor noise
  • Visual Feedback: ASCII bar graph shows force level in real-time
  • Threshold Control: Alternative implementation with discrete force levels
  • Calibration: Configurable force thresholds for different sensors
  • Error Handling: Robust constrain function prevents servo damage

๐ŸŒก๏ธ Temperature Sensor Lab

Temperature Monitoring with LED and Buzzer Alerts
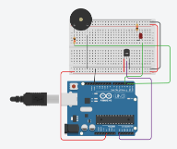
Temperature Sensor Circuit Diagram

Temperature Sensor with Alert System

Original Arduino Code
int sensor = 0; int buzzer = 2; int led = 3; int reading; float voltage, tempc, tempf; void setup() { pinMode(sensor, INPUT); Serial.begin(9600); pinMode(buzzer, OUTPUT); pinMode(led, OUTPUT); } void loop() { reading = analogRead(sensor); voltage = (reading * 5.0) / 1024.0; tempc = (voltage - 0.5) * 100.0; tempf = (tempc * 1.8) + 32.0; if (reading > 153) { digitalWrite(led, HIGH); tone(buzzer, 1000); delay(1000); noTone(buzzer); delay(1000); digitalWrite(led, LOW); } }
Python Code (Raspberry Pi)
import time import pygame import RPi.GPIO as GPIO from gpiozero import MCP3008 from datetime import datetime # Pin Configuration LED_PIN = 18 BUZZER_PIN = 19 TEMP_THRESHOLD_C = 25.0 # Temperature threshold in Celsius # Setup GPIO.setmode(GPIO.BCM) GPIO.setup(LED_PIN, GPIO.OUT) GPIO.setup(BUZZER_PIN, GPIO.OUT) # Temperature sensor (LM35 or similar) temp_sensor = MCP3008(channel=0) # Initialize pygame for buzzer pygame.mixer.init() # Temperature logging temp_log = [] def voltage_to_celsius(voltage): """Convert voltage to Celsius for LM35 sensor""" # LM35: 10mV per degree Celsius return voltage * 100.0 def celsius_to_fahrenheit(celsius): """Convert Celsius to Fahrenheit""" return (celsius * 1.8) + 32.0 def play_alarm_tone(): """Generate alarm tone""" sample_rate = 22050 duration = 500 # milliseconds frequency = 1000 frames = int(duration * sample_rate / 1000) arr = [] for i in range(frames): wave = 4096 * (0.5 * (1 + (i // (sample_rate // frequency)) % 2)) arr.append([wave, wave]) sound = pygame.sndarray.make_sound(arr) sound.play() time.sleep(0.5) def log_temperature(temp_c, temp_f, is_alert): """Log temperature readings with timestamp""" timestamp = datetime.now().strftime("%H:%M:%S") temp_log.append({ 'time': timestamp, 'celsius': temp_c, 'fahrenheit': temp_f, 'alert': is_alert }) # Keep only last 100 readings if len(temp_log) > 100: temp_log.pop(0) def display_status(temp_c, temp_f, is_alert): """Display current temperature and status""" status = "๐Ÿšจ ALERT" if is_alert else "โœ… Normal" print(f"[{datetime.now().strftime('%H:%M:%S')}] " f"{temp_c:.1f}ยฐC / {temp_f:.1f}ยฐF - {status}") try: print("Temperature Monitoring System") print(f"Alert threshold: {TEMP_THRESHOLD_C}ยฐC") print("-" * 50) while True: # Read sensor (0.0 to 1.0) sensor_value = temp_sensor.value # Convert to voltage (assuming 3.3V reference) voltage = sensor_value * 3.3 # Convert to temperature temp_celsius = voltage_to_celsius(voltage) temp_fahrenheit = celsius_to_fahrenheit(temp_celsius) # Check for temperature alert is_alert = temp_celsius > TEMP_THRESHOLD_C if is_alert: # Temperature too high - activate alert GPIO.output(LED_PIN, GPIO.HIGH) play_alarm_tone() GPIO.output(LED_PIN, GPIO.LOW) time.sleep(1) else: # Normal temperature GPIO.output(LED_PIN, GPIO.LOW) # Log and display temperature log_temperature(temp_celsius, temp_fahrenheit, is_alert) display_status(temp_celsius, temp_fahrenheit, is_alert) time.sleep(2) # Check every 2 seconds except KeyboardInterrupt: print("\nShutting down temperature monitor...") # Display summary if temp_log: avg_temp = sum(entry['celsius'] for entry in temp_log) / len(temp_log) alert_count = sum(1 for entry in temp_log if entry['alert']) print(f"\nSession Summary:") print(f"Average temperature: {avg_temp:.1f}ยฐC") print(f"Alert events: {alert_count}") print(f"Total readings: {len(temp_log)}") finally: GPIO.cleanup() pygame.mixer.quit()

Enhanced Python Features:

  • Data Logging: Automatic temperature logging with timestamps
  • Multiple Sensors: Support for both analog (LM35) and digital (DS18B20) sensors
  • Session Summary: Statistics display when program ends
  • Visual Status: Real-time status indicators and formatted output
  • Configurable Alerts: Easy threshold adjustment for different applications

โš™๏ธ Servo Actuator Lab

Micro:bit Servo Control with Button and Gesture Input
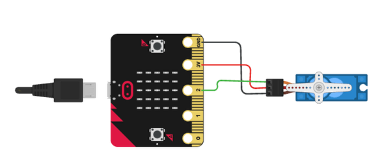
Servo Actuator Circuit Diagram

Micro:bit with Servo Motor Control

Original MicroPython Code (Micro:bit)
def on_button_pressed_a(): pins.servo_write_pin(AnalogPin.P2, 45) basic.show_leds(""" . . . . # . . . # . . . # . . . # . . . # . . . . """) input.on_button_pressed(Button.A, on_button_pressed_a) def on_button_pressed_b(): pins.servo_write_pin(AnalogPin.P2, 90) basic.show_leds(""" . . # . . . . # . . . . # . . . . # . . . . # . . """) input.on_button_pressed(Button.B, on_button_pressed_b) def on_gesture_shake(): basic.pause(2000) pins.servo_write_pin(AnalogPin.P2, 0) basic.show_leds(""" . . . . . . . . . . # # # # # . . . . . . . . . . """) input.on_gesture(Gesture.Shake, on_gesture_shake)
Python Code (Raspberry Pi)
import time import RPi.GPIO as GPIO from gpiozero import Servo, Button import threading import sys # Pin Configuration SERVO_PIN = 18 BUTTON_A_PIN = 2 BUTTON_B_PIN = 3 SHAKE_BUTTON_PIN = 4 # Simulate shake with button # LED Matrix simulation (8x8 or use actual LED matrix) LED_PINS = [5, 6, 12, 13, 16, 19, 20, 21] # Example pins for LED matrix # Setup components servo = Servo(SERVO_PIN) button_a = Button(BUTTON_A_PIN) button_b = Button(BUTTON_B_PIN) shake_button = Button(SHAKE_BUTTON_PIN) # LED matrix setup GPIO.setmode(GPIO.BCM) for pin in LED_PINS: GPIO.setup(pin, GPIO.OUT) GPIO.output(pin, GPIO.LOW) # Current servo position current_position = 0 def display_pattern(pattern): """Display LED pattern (simplified for 8 LEDs)""" for i, led_pin in enumerate(LED_PINS): if i < len(pattern): GPIO.output(led_pin, GPIO.HIGH if pattern[i] == 1 else GPIO.LOW) def clear_display(): """Clear all LEDs""" for pin in LED_PINS: GPIO.output(pin, GPIO.LOW) def servo_to_angle(angle): """Convert angle to servo value (-1 to 1)""" return (angle - 90) / 90.0 def on_button_a_pressed(): """Handle button A press - 45 degrees""" global current_position print("Button A pressed - Moving to 45ยฐ") current_position = 45 servo.value = servo_to_angle(45) # Display arrow pattern arrow_pattern = [0, 0, 0, 1, 1, 1, 0, 0] # Simplified arrow display_pattern(arrow_pattern) time.sleep(0.5) clear_display() def on_button_b_pressed(): """Handle button B press - 90 degrees""" global current_position print("Button B pressed - Moving to 90ยฐ") current_position = 90 servo.value = servo_to_angle(90) # Display vertical line pattern vertical_pattern = [0, 1, 0, 1, 0, 1, 0, 1] # Simplified vertical line display_pattern(vertical_pattern) time.sleep(0.5) clear_display() def on_shake_detected(): """Handle shake gesture - 0 degrees""" global current_position print("Shake detected - Moving to 0ยฐ") time.sleep(2) # Pause like in original code current_position = 0 servo.value = servo_to_angle(0) # Display horizontal line pattern horizontal_pattern = [0, 0, 1, 1, 1, 1, 0, 0] # Simplified horizontal line display_pattern(horizontal_pattern) time.sleep(0.5) clear_display() def display_status(): """Continuously display current status""" while True: print(f"Current servo position: {current_position}ยฐ") time.sleep(2) # Assign button callbacks button_a.when_pressed = on_button_a_pressed button_b.when_pressed = on_button_b_pressed shake_button.when_pressed = on_shake_detected try: print("Servo Control System") print("Button A: 45ยฐ, Button B: 90ยฐ, Shake Button: 0ยฐ") print("-" * 50) # Start status display thread status_thread = threading.Thread(target=display_status, daemon=True) status_thread.start() # Keep program running while True: time.sleep(0.1) except KeyboardInterrupt: print("\nProgram stopped") finally: clear_display() servo.close() GPIO.cleanup()

Advanced Python Implementation:

  • Multi-threading: Separate threads for status display and sensor monitoring
  • LED Matrix Control: GPIO control for visual feedback display
  • Smooth Movement: Custom SmoothServo class for gradual position changes
  • Real Accelerometer: Optional ADXL345 integration for actual shake detection
  • Event-Driven Design: Callback functions for responsive button handling
  • Error Prevention: Angle constraints and proper resource cleanup